Leather Boots Step by Step
This continues as part of my 200mm German General at Stalingrad figure.
I benefitted loads from step by steps and wanted to give something back so I wanted to share my leather effect technique.
Leather usually has a slight sheen on it. Semi gloss doesn't cut it and most satins dont give that all important depth.
The sbs described is for worn leather being used in industrial grimy city debris as will be depicted in the base. I wanted my general to look dishevilled and fatigued and his uniform and equipment showing wear and tear in a quiet desperation kind of way.
When doing black I never use straight black. If it's worn clothing I drop a bit purple in there. For worn black leather, orange brown or yellow rust seems to do the trick.
Paints used on the boots are all vallejo.
Black
Yellow Rust
German Camo Beige
Game ink sepia
Game ink black
Step one
Base colour mix of black and yellow rust.
By using a rougher primer you can achieve a pebble effect if say you are doing a jacket. But ive gone for a medium primer instead of the smooth tamiya stuff because I want to give some texture.

Step two
Grab some sepia game ink and dilute it to about 10 parts water 1 part ink.
I then brushed from the top to the ankle seam but did meaningly go over the seam at times and I'll explain why later.
The ink dries relativley quickly and you need to apply this about 20 to 30 times.
*IMPORTANT* If you use too much ink to water the effect is more gloss and ruins the sheen you want. It's important to emphasise although it's laborious you really do need to dilute the ink well and use plenty of passes as you get more control.
When the ink takes longer to dry you know you're getting there and I use a hair dryer to speed things up. Remember to keep stirring the mix because the ink goes to the bottom of the palette dish.
You can see where the sheen stops in the pic.

Step three
Do the same with black game ink but do the bottom part and go over the ankle seam into the sepia sheen. The reason for this is it blends the two colours together gradually and gives that tone fade of light to dark from the top of the boot to the bottom. The bottom part doesn't need so many washes as this is where the wear and tear takes the polish off and you want more of a matt effect.

Step four
Grab some yellow rust on a flat brush, wipe most of the paint of onto a rag and drybrush the creases, seams and toe of the boots. This will highlight the seams and creases to give more depth. Do the same with german camo biege but just do the edges of the soles of the boots.
I will also drybrush a dust/ earth colour on top of the rust colour to tone it down but I will decide on that when I tie it into the base.
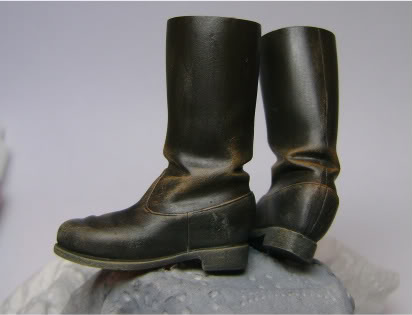
Step five
Mix some black acrlyilic paint with water and pinwash some into the part where the sole meets the leather and where the seams of the leather are to give more depth. Also place a small amount on the shadows of the creases to increase depth. I will use black oil paint to do this again once the boots are tied into the groundwork. The boots as they are will be glued to the figure and then weathered some more but I'm hoping you get the idea of the use of inks, drybrushing, shadows and highlights.

The same technique was used for this Panzer commanders jacket using a rough primer where you can see the pebbled effect:

I benefitted loads from step by steps and wanted to give something back so I wanted to share my leather effect technique.
Leather usually has a slight sheen on it. Semi gloss doesn't cut it and most satins dont give that all important depth.
The sbs described is for worn leather being used in industrial grimy city debris as will be depicted in the base. I wanted my general to look dishevilled and fatigued and his uniform and equipment showing wear and tear in a quiet desperation kind of way.
When doing black I never use straight black. If it's worn clothing I drop a bit purple in there. For worn black leather, orange brown or yellow rust seems to do the trick.
Paints used on the boots are all vallejo.
Black
Yellow Rust
German Camo Beige
Game ink sepia
Game ink black
Step one
Base colour mix of black and yellow rust.
By using a rougher primer you can achieve a pebble effect if say you are doing a jacket. But ive gone for a medium primer instead of the smooth tamiya stuff because I want to give some texture.
Step two
Grab some sepia game ink and dilute it to about 10 parts water 1 part ink.
I then brushed from the top to the ankle seam but did meaningly go over the seam at times and I'll explain why later.
The ink dries relativley quickly and you need to apply this about 20 to 30 times.
*IMPORTANT* If you use too much ink to water the effect is more gloss and ruins the sheen you want. It's important to emphasise although it's laborious you really do need to dilute the ink well and use plenty of passes as you get more control.
When the ink takes longer to dry you know you're getting there and I use a hair dryer to speed things up. Remember to keep stirring the mix because the ink goes to the bottom of the palette dish.
You can see where the sheen stops in the pic.
Step three
Do the same with black game ink but do the bottom part and go over the ankle seam into the sepia sheen. The reason for this is it blends the two colours together gradually and gives that tone fade of light to dark from the top of the boot to the bottom. The bottom part doesn't need so many washes as this is where the wear and tear takes the polish off and you want more of a matt effect.
Step four
Grab some yellow rust on a flat brush, wipe most of the paint of onto a rag and drybrush the creases, seams and toe of the boots. This will highlight the seams and creases to give more depth. Do the same with german camo biege but just do the edges of the soles of the boots.
I will also drybrush a dust/ earth colour on top of the rust colour to tone it down but I will decide on that when I tie it into the base.
Step five
Mix some black acrlyilic paint with water and pinwash some into the part where the sole meets the leather and where the seams of the leather are to give more depth. Also place a small amount on the shadows of the creases to increase depth. I will use black oil paint to do this again once the boots are tied into the groundwork. The boots as they are will be glued to the figure and then weathered some more but I'm hoping you get the idea of the use of inks, drybrushing, shadows and highlights.
The same technique was used for this Panzer commanders jacket using a rough primer where you can see the pebbled effect:
